Unit 05: Paint Shop
Pro 7 Basics
Making a Photo Collage
1. Combining
two pictures
1.1. Click on Start/Programs/Jasc Software and finally Click again on Paint Shop Pro.
1.2. Click on Open. From your Professor's LAN account, Browse for the document PSPBASICS.
1.3. Click on the image of a Mountain, then Click Open.
1.4. On Paint Shop Pro menu, Click
on ![]() again. After that, Click on the image of
a building then Click Open.
again. After that, Click on the image of
a building then Click Open.
1.5. On Paint Shop Pro menu, Click on the image of the building, then Click on Edit > Copy.
1.6. Click on the image of the Mountain, then Click on Edit > Paste as New Layer.
Our new image now consists
of two layers: the original layer (Layer 1) and the new layer (Layer
2), which appears on top of Layer 1. |
1.7. Select the Freehand
Tool ![]() on
the toolbar.
on
the toolbar.
1.8. If you don't see it, Move the
cursor to the Tool Options pallet ![]() and Click on the Icon
and Click on the Icon ![]() .
.
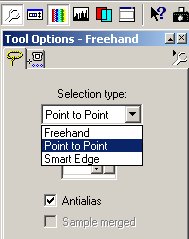
1.9. Select Point to Point as the selection type and Mark the Antialias checkbox.
1.10. Now remove the sky from the top of the building. To do this, start by Clicking and Making a contour of the trees and the top of the building. When you've got everything selected Double-click.
1.11. Hit the Delete key.
1.12. Click on the Mover
Button ![]()
1.13. Click on the picture of the building and Drag it down to the half lower part. This way you will be able to see the mountains on the top and the water of the pond at the lower part simultaneously.
1.14. Click on Selections > Select None. IMPORTANT: Sometimes the Selections > Selection None option is already disabled.
2. Changing Points of View
2.1. Click on Image > Mirror. The bigger tree must be now on the left side of the picture.
3. Final Touches
3.1. If you have difficulty seeing it just
Click on the Zoom Button ![]()
3.2. Click on the Eraser
Button ![]() . Remove
the white edges on the top of the trees and the building.
. Remove
the white edges on the top of the trees and the building.
3.3. When you finish removing the white edges Click on View > Normal Viewing.
3.4. To combine the layers into one merged layer Choose Layers > Merge > Merge All (Flatten).
3.5. Notice a red spot in the pond. To get
rid of it, Select the Scratch Remover Tool ![]() ,
and then Left-click and Drag a selection
box around the spot. When you release the left mouse button, the red spot
will disappear.
,
and then Left-click and Drag a selection
box around the spot. When you release the left mouse button, the red spot
will disappear.
4. Applying Effects
4.1. On the main menu Click on Effects, then, Click on 3D Effects.
4.2. Click on Buttonize.
4.3. Change the settings to Height 10, Width 10 and Opacity 80.
4.4. Click on Transparent.
4.5. After that, Click OK.
5. Saving the Image
5.1. Save the image to your account and Name it MountainBuilding.
5.2. Call the facilitator to check this activity.
Vocabulary
1. Find words in the tutorial which match these definitions.
| a. | distance from side to side. |
| b. | body of water smaller than a lake. |
| c. | move down. |
| d. | a small area. |
| e. | to make adhere. |
| f. | below in place. |
| g. | border. |
| h. | the distance from the bottom to the top. |
| i. | to unite. |
| j. | made unable. |
Home
Plano
de Ensino
1. Program Design
2. The Java Revolution
3. The Language of Instructions
4. What is Javascript
PDF: Backflip
Programming: Quizzes
Computer and Internet Quiz
5 . Paint Shop Pro 7 Basics
Programming II: Quizzes
Computer Viruses
PDF: WaterMarks
Photoshop 01: Toolbox and Convert to Black and White
Photoshop 02: Feather and Drop-down Shadow effects
Photoshop 03: Posterization and Colorizing
6 . Building A Basic Website 01
7 . Building A Basic Web Site 2
8. Flash Bascis 01
9. Flash Basics 02
Test 01
Test 02
S@ndroSousa