Let's create an animation. However, it is not
as professional as the one above. :)
FLASH AUTHORING
O componente de autoria Flash do projeto consiste de três atividades:
• Familiarização com a interface do Flash e ferramentas
de desenho
• Criação de um plano de animação
• Animando imagens e texto
1. Introduction to Flash
A. What is Flash?
Adobe Flash (previously called Macromedia
Flash) is a multimedia graphics program especially for
use on the Web. Flash enables you to create interactive "movies"
on the Web. Flash uses vector graphics, which means that
the graphics can be scaled to any size without
losing clarity/quality. Flash does not require programming skills
and is easy to learn
Flash vs. Animated Images and Java Applets
Animated images and Java applets are often used to create dynamic effects
on Web pages. The advantages of Flash are:
Flash loads much faster than animated images.
Flash allows interactivity, animated images do not.
Flash does not require programming skills, Java applets do.
B. Flash How to...
Who can View Flash?
Macromedia writes: "In September 2000, NPD Research, the parent company
of MediaMetrix, conducted a study to determine what percentage of Web browsers
have Macromedia Flash preinstalled. The results show that 96.4% of Web users
can experience Adobe Flash content without having to download and install
a player."
Macromedia Shockwave Player is shipped with Windows 95, 98, MacOS, Internet
Explorer CD, and America Online.
If you do not have the Shockwave Player installed you can download it for
free from Adobe's site (200 K).
Who can Create Flash Movies?
To create your own Flash movies you need to buy a Flash program. The latest
version is Adobe Flash CS4.
In this tutorial, we will be using Macromedia Flash 08.
The tools for painting are kept in the "Tools" bar, usually positioned
at the left top of your Flash Screen.
1.1 Creating Simple Flash Movies
in Macromedia Flash 08
CREATING A MINI-LESSON MOVIE
Neste Projeto, dividido em duas partes: Flash Basics 01 e
Flash Basics 02, você usará o inglês para
entender o texto ao mesmo tempo em que praticará as seguintes habilidades
de criação no Flash:
• Criar uma animação simples
• Criar uma animação de texto
• Tranformar um objeto em outro.
• Inserir uma imagem, convertê-la em um botão e adicionar
uma URL para que ele se torne um link.
• Criar seu próprio botão e adicionar uma
URL para que ele se torne um link.
GUIDED EXPLORATION OF THE FLASH INTERFACE
The following provides a short introduction to Flash. Many of the steps are
left open-ended so that you can explore the Flash interface and tool set prior
to starting the project. There are several other resources available that
provide introductions to various aspects of Flash. Guided exploration combines
step-by-step instructions with open-ended suggestions so that you can compare
the results of the different options. Comparing results allows you to see
the range of possibilities and sparks creativity and a better understanding
of the application. If you are already familiar with Flash, you can skip to
Activity 1: Creating a Plan for Your Animation.
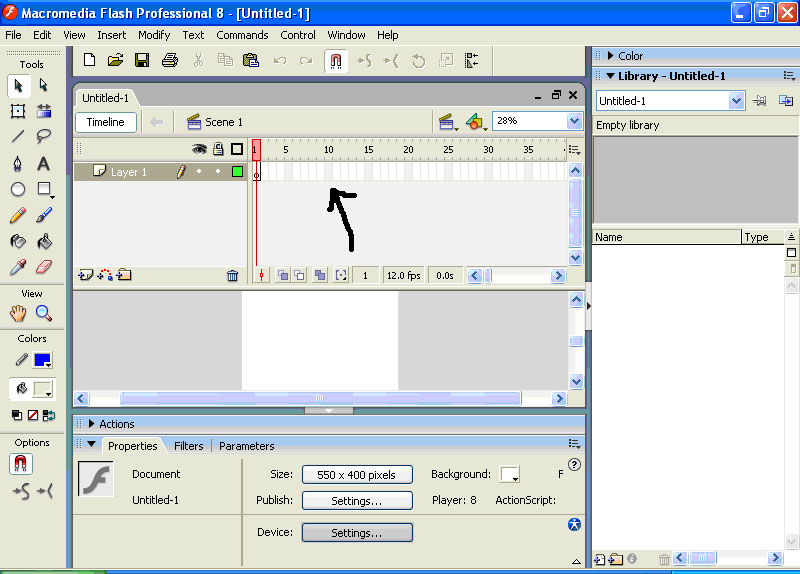
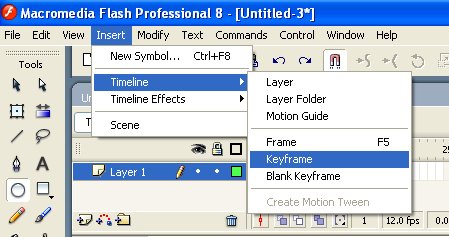
To explore the Flash 08 interface:
01. Click on Start > All Programs
> Macromedia Flash 8. Create New > Flash Document.
The main work area is called the Stage. Above the Stage is the Timeline.
If you don't see it, press Ctrl + Alt + T.
02. Notice the title bar at the top of the
window. This title bar displays the movie title. When you first open Flash,
the new movie is called Untitled-1 until you save the file with a
new name.
03. Click through the top menu bar to get an idea of the
menu selections and locations. Pay particular attention to the Edit, Insert,
Modify, and Control menus. These menus contain many of the design
element and manipulation functions.
04. Note the location of the following elements. Write
down the main menu that each item is found under because you will
be using these commands later in the project.
• Character
• Library
• Frame
• Panels set
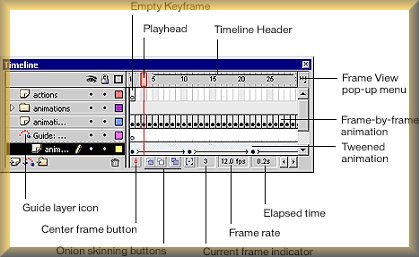
The Timeline is a key organizational and navigational tool
for your animations. Here graphics are animated over time. You coordinate
the timing of the animation and assemble the artwork in separate layers on
the Timeline. The Timeline displays each frame in the movie.
01. Defina Timeline em português:
.
02. Dê a tradução para Artwrok:
.
05. Position the pointer
over each icon in the Timeline to read the title. All of the tools on the
left side of the Timeline coordinate Layers.
Layers are like transparent sheets of acetate stacked on top of each other.
When you create a new movie, it contains one layer. You can add more layers
to help organize the artwork, animation, and other elements in your movie.
The Toolbox contains Flash drawing tools and other tools you’ll need
to create and manipulate graphics in order to make animations. The Tools section
contains drawing, painting, and selection tools. The View section contains
tools for zooming and panning the application window. The Colors section contains
modifiers for the selected tool, which affect the tool’s painting or
editing operations.
Below, you see the toolbox of Macromedia Flash MX and Macromedia
Flash 8.
To use the Rectangle tool:
01. Click the Rectangle tool.
02. The pointer turns into a cross. Drag the pointer to draw.
Draw a rectangle in the middle of the Stage.
03. Use the Colors controls to select new Stroke and Fill colors. Draw
three more rectangles of various colors and sizes.
04. To delete any undesired object, element, or effect, Select
Edit > Undo. Note: You must select the Stroke and Fill color before you
draw; otherwise, you must select the object with the Arrow tool and select
Stroke and Fill color.
To use the Oval tool:
Flash provides tools for drawing ovals as well as rectangles. Either tool
can draw a shape as an outline or as a solid.
01. In the Toolbox select the Oval tool.
02. To activate the Fill-Color box select the Paint Bucket
icon in the Colors section of the Toolbox.
03. Move the pointer over the Stage. It turns into a plus
sign.
04. Drag to create an oval or rectangle with the size and
proportions you want.
USING PANELS
Floating panels help you view, organize, and change elements in a movie. The
options available on panels control
the characteristics of selected elements. Panels let you work with objects,
colors, text, instances, frames, scenes, and entire movies.
To set stroke attributes using panels:
A line has three Stroke Attributes: color, thickness, and style.
To set stroke attributes in the Stroke panel:
01. Click on Line Tool.
02. Click the Stroke-Color box. The pointer changes to an
eyedropper and a set of color boxes appears. The eyedropper is the default.
03. To select a color, either click a color box or type
a hexadecimal value representing a color in the Hexadecimal-Color field. To
select none (no color), click the box with a red line through the center.
Select one of the many shades of blue.
04. To set a line weight in the Stroke-height field, enter
a number between 0.25 and 10 or use the slider to set a value.
Compare line weights, choose .25 then choose
5.
05. To select a line style, click the Line Style menu in
the Stroke properties panel. When you select a style, a graphic representation
of that style appears in the line-style field. Select Solid.
06. Draw several ovals changing the stroke attributes.
03. Dê a tradução
de stroke color e fill color em português:
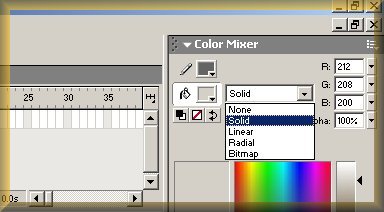
To set fill attributes using panels:
Flash has five fills: none, solid, linear gradient, radial
gradient, and bitmap. You set the fill type and related attributes in the
Fill panel.
01. From the Fill menu, Choose
a fill type. The attributes for that fill type appear in the panel below the
menu. Select Solid.
02. Click the Fill-color box. The pointer changes to an eyedropper
and a set of color boxes appears.
03. To select a color, either click a color box or Type
in a hexadecimal value representing a color in the Hexadecimal-Color field.
Choose light blue.
04. Draw another oval with the new fill attributes. Note: To select none (no fill color), click the box with
a red line through the center. To open a hidden panel, Choose
Window and Select a panel (i.e. Info). You can open all panels
by selecting Window > Workspace Layout > Default.
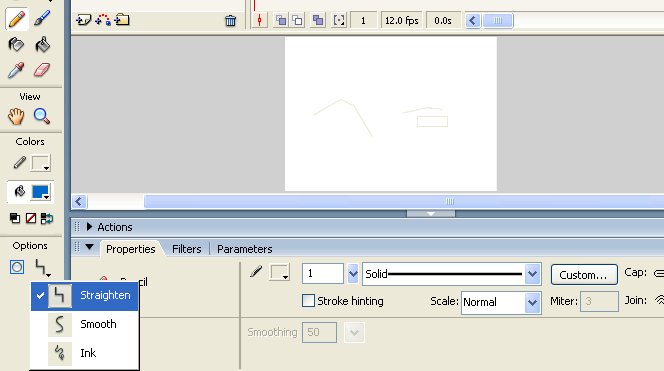
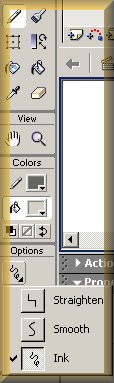
To use the Pencil tool:
The Pencil tool allows you to draw with two free-form modes—straighten
and smooth—that help you draw precise, smooth shapes. You can use the
Straighten mode to eliminate small inconsistencies that can spoil freehand
sketches. Straighten changes your freehand lines into straight lines and regular
arcs.
01. In the Toolbox Select Pencil Tool. The Pencil tool modifiers
appear.
02. From the Pencil Mode option tools, Choose Straighten.
04. Traduza os verbos Spoil
e Straighten:
.
03. Move the pointer over
the Stage and the pointer turns into a Pencil icon.
04. Click and Draw a curvy line.
• Flash previews your rough draft.
• Release the mouse button.
• Flash turns the line into a set of straight line segments and regular
curves.
05. With the Pencil tool in Straighten mode, quickly Draw
a rectangle or circle. Release the mouse button. Flash recognizes
the shape and draws a perfect rectangle or oval.
06. With the Pencil tool selected, Choose Ink from the Pencil
Mode menu.
07. Move the pointer over
the Stage and draw a curvy line. When you release the mouse button, Flash
makes your line less jagged, but leaves your curves as you
drew them.
05. O que significa jagged?
.
06. Drew é passado de que verbo e o que ele significa em português?
.
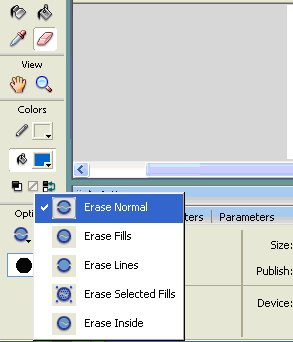
To use the Eraser tool:
Erasing with the Eraser tool removes strokes and fills. You can quickly erase
everything on the Stage, Erase individual stroke segments
or filled areas, or erase by dragging.
01. Using Normal Mode to erase strokes and fills:
• Select the Eraser in the Toolbox.
• Choose Erase Normal from the Eraser Mode
menu.
• Choose a size and shape of the eraser from the Eraser
Shape menu.
• Move the pointer over the Stage and drag
to erase.
• Use the Eraser tool to erase previously created ovals.
02. Using the Faucet
Modifier to erase a line:
• In the Toolbox with the Eraser tool selected, click
the Faucet button.
• Place the faucet over the line you want to erase.
• Click. (Flash deletes the entire line.)
03. Using the Faucet Modifier to erase a fill:
• Select the modifier for the Eraser tool.
• Place the faucet over the fill you want to erase.
• Click. (Flash deletes the fill.)
• Use the Facet Modifier to erase rectangle fills.
04. To quickly erase everything on the Stage, double-click
the Eraser tool.
These are the basic
elements of the Flash interface. Each activity that follows will provide you
with step-by-step instructions on how to create a movie.
Activity 1: Creating a Plan
for Your Animation
Approximate time to complete: 20 minutes or more depending
on the scope of the project. Nesta atividade você aprenderá a:
• Criar um storyboard
• Trabalhar com animação com quadros
• Configurar as propriedades para o filme
To plan the animation (Flash movie):
A storyboard is a plan for your animation. Storyboarding
is an important first step in creating a Flash movie. A storyboard
is a series of panels with sketches that show how the movie will progress.
The storyboard becomes increasingly important the more complex the movie or
animation. In an academic setting, planning is part of the Project-based framework.
Both students and teacher can evaluate the plan to check that it meets the
required criteria.
07. O que é Storyboard
em português e qual a sua importância?
01. Use notebook paper to draw out a series of panels, similar to a comic
book. Each panel represents the Stage, where the action takes place.
02. Use numbers to designate each “frame” of the action on the
Stage. These transition actions are called Keyframes. Keyframes define the
changes in an animated sequence, such as the object’s movement or change
in characteristics.
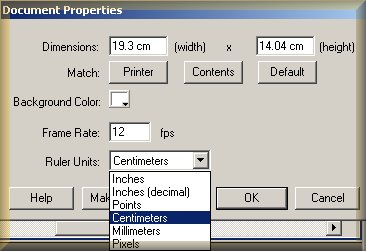
To set the movie properties:
You can set Stage size and background color in Flash using the Document
Properties dialog box.
01. From the Modify menu, Choose Document.
02. The Document Properties dialog box appears (refer to figure for steps
3–4 ).
03. In the Document Properties dialog box, Click the Ruler
Units pop-up menu.
04. From the pop-up menu, Select the units in which you prefer
to work. Flash will use these units to calculate all measured items on the
Stage: rulers, grid, spacing, and dimensions.
To set Stage size:
The Stage is the area where all of the action takes place. Just like in a
theater production, it is the area in which the actors perform for the audience.
01. Enter the Height and Width in the appropriate fields
of the Dimension section.
02. ClickPrinter to have your stage size match
the maximum print area currently available to you.
03. You can clickContents to create a stage area
just large enough to cover the elements in your movie. However, for this project
we will use the default size of 550px x 400px. If you change
the Ruler Units the width and height dimensions of the Stage will stay the
same. Flash will automatically calculate and convert the size into the requested
equivalent units.
To set Background Color: The Background Color is the color of your backdrop for the Stage.
It is the actual Background Color for your movie.
01. Click the Color box in the Background Color section of
the Movie Properties dialog box.
02. For this project Select the Background Color White.
To set the Frame Rate: A frame is one single still image among the many that make up a movie.
The Frame Rate is the number of frames per second of a Flash movie.
08. Defina Frame Rate em
português:
.
01. Leave 12 as the value for Frame Rate. The total number
of frames times the frame rate determines the length of the movie. This is
the default set in Flash. The majority of computers can display this frame
rate smoothly.
02. Once you have made all of the changes, ClickSave
Default. Note: A frame rate that’s too slow makes the animation
appear to stop and start; a frame rate that’s too fast blurs thedetails
of the animation. A frame rate of 12 frames per second (fps) usually gives
the best results on the Web (the standard motion-picture rate is 24 fps).
Most QuickTime and AVI movies have a frame rate of 12 fps. Flash allows only
one frame rate for the entire Flash movie, so a good idea is to set this rate
before you begin creating an animation.
Activity 2: Creating a Short Animation
Approximate time to complete: 20–40
minutes.
A fim de criar um pequeno filme, os seguintes tópicos são vistos
nesta atividade:
• Entendendo uma animação
• Tipos de quadros: Vazio, chave, padrão, interpolado
• Inserindo um quadro
• The Playhead
• A linha do tempo: Régua, Barra de Status
• Criando uma animação
• Modificando atributos
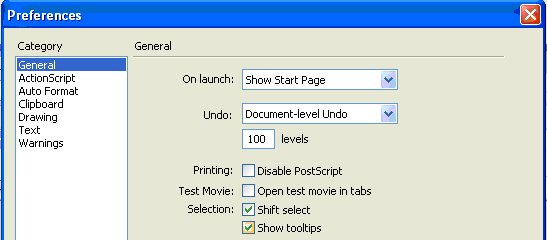
To use Tooltips:
01. If the Tools panel is not already open, SelectWindow
> Tools.
02. To turn on Tooltips (annotations appear when the pointer is positioned
at a button or icon), from the Edit menu ChoosePreferences.
03. In the Preferences dialog box select the General tab.
04. Check the Show Tooltips box.
To create a
simple bouncing ball:
01. Click File > New > Flash Document. Click
on OK. Flash automatically creates a document with one layer and
a keyframe in Frame 1 of the Timeline.
02. Click File > Save As.
03. In the Save As dialog box next to File Name, Save your
file as Bounce. Note: Create a file folder
to save the movie. Place the folder on your IFRN LAN Account.
04. Click Save.
05. In the Timeline, Click Frame 1 to select it.
06. In the Toolbox Select the Oval tool.
• Set the Stroke color to none
(see "To set stroke attributes using panels").
• Set the Fill color to orange. Note: To help orient the drawing on the Stage,
you can turn on the rulers and grids.
07. Choose View > Rulers. To see the grid, Choose
View > Grid > Show Grid.
08. Near the middle of the Stage Draw a circle.
09. In the Timeline select Frame 1.
10. From the menu bar Choose Insert > Timeline
> Create Motion Tween.
11. In the Timeline Select Frame 5.
12. From the menu bar Choose Insert > Timeline
> Keyframe.
13. Select the Arrow tool
(A) and Drag the circle to the bottom of the Stage.
The solid bullet in Frame 5 indicates you have created
content in a keyframe.
14. In the Timeline Select Frame 10.
15. Choose Insert > Timeline > Keyframe.
16. Move the circle back to the middle of the Stage where
it began.
17. Choose Window > Toolbars > Controller.
Click Play on the Controller to preview your animation.
To change the color of the ball:
Using the circle you created, you will add new colors to each “bounce.”
09. Traduza Bounce:
.
01. Select Frame 5 and Click on the ball.
02. In the Properties panel
• Click the color box.
• Choose a tint color.
03. Click Play on
the Controller to preview your animation.
04. Select Frame 15, Right-click and
Choose Keyframe.
05. Drag the circle to the bottom of the screen.
06. Click on the ball and change the tint.
07. Repeat steps 4 through 6 every five frames moving the
position and color of the circle to create six different colors in all.
Note: Ending at Frame 30 leaves the ball positioned at the
center of the Stage. Ending at Frame 35 leaves the ball positioned at the
bottom of the Stage.
08. Test the animation. Click Play
on the Controller. The circle has turned to a color-changing bouncing ball.
To adjust the size of the ball:
Using what you have created, you will adjust the size of the “bouncing
ball.” You do all the editing through keyframes now that you have created
a motion tween.
01. Select Frame 5.
02. With your Free Transform Tool selected, Click on the
ball.
Square handles appear on all four corners of
the box surrounding your element.
03. Move the pointer over a handle.
• To change the size of your element, Drag
one of the corner handles.
• Make your element smaller.
04. Click Play on the Controller to preview your
animation.
05. Repeat steps 1–4 every five frames, alternately
changing the size from smaller to larger.
06. Test the animation. When you are satisfied with the appearance,
save the movie. ChooseFile > Save or use the
keyboard shortcut.
To manipulate the graphic elements:
Using what you have created, you will manipulate the position of your “bouncing
ball.”
01. Select Frame 10.
02. With the Arrow tool selected, Move your pointer over
the Stage and Drag your circle to the left side.
03. Select Frame 15. Move your pointer over
the Stage and Drag your circle to the top.
04. Select Frame 20. Move your pointer over
the Stage and Drag your circle to the right.
05. ClickPlay on the Controller to preview your
animation.
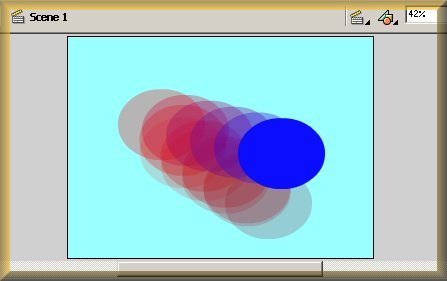
To create special effects:
Using what you have created, you will create some special effects for the
“bouncing ball.”
01. Select Frame 40 on your Timeline.
02. Choose Insert > Keyframe.
03. Click on the ball once.
• Click the pop-up window and SelectTint.
• Change the color of the ball to red.
04. Select Frame 55 on your Timeline.
05. Choose Insert > Keyframe.
06. Select the Free Hand Transform Tool and Drag
the corner of the square surrounding your circle to make it larger.
07. In the Color box, ChooseBrightness. In the
Brightness amount box, Type 100%.
Flash 08
Flash MX
08. Click Play on
the Controller to preview your animation.
09. Save your work.


 Flash 08
  Flash MX